Web & Email
Bitcoin blackmail scam
Our team notice there is an increase of scamming with the following similarity subject globally.
“account target@domain.com is compromised”
Reference:
US-CERT (United States Computer Emergency Readiness Team)
FBI (Federal Bureau of Investigation)
Intego (Security company)
We received similar scams as well on last week. Let’s go through some of the header & content.
A) Email header + content
Any email divided into an Email header and Email body.
Email header record every single relay point of the email went through before reaching your mailbox.
It is like how you trace your parcel from courier express when you purchase something online.
| Received: from [12.12.12.123] (UnknownHost [12.12.12.123]) by mail.domain.com with SMTP; Thu, 26 Oct 2018 06:17:21 +0800 Message-ID: <xxxxxx> From: <target@domain.com> To: <target@domain.com> Subject: account target@domain.com is compromised Date: 26 Oct 2018 06:00:12 +0800 |
Suspicious 1:
| I’m a hacker who cracked your email and device a few months ago. You entered a password on one of the sites you visited, and I intercepted it. Of course you can will change it, or already changed it. But it doesn’t matter, my malware updated it every time. Do not try to contact me or find me, it is impossible, since I sent you an email from your account. |
Analysis
If you have my email account password, why not you direct authenticate/relay over the mail server but need to send from a third party host [12.12.12.123] then pretend that you know my password?
Suspicious 2:
| Through your email, I uploaded malicious code to your Operation System. I saved all of your contacts with friends, colleagues, relatives and a complete history of visits to the Internet resources. Also I installed a Trojan on your device and long tome spying for you. You are not my only victim, I usually lock computers and ask for a ransom. But I was struck by the sites of intimate content that you often visit. |
Analysis
The spammer seems trying to put in pressure.
If he/she is a real hacker who gotten “full access” to my laptop/desktop then he/she should deploy a ransomware but not perform a scam and wait for me to take the bait.
Suspicious 3:
| So, when you had fun on piquant sites (you know what I mean!) I made screenshot with using my program from your camera of yours device. After that, I combined them to the content of the currently viewed site. There will be laughter when I send these photos to your contacts! BUT I’m sure you don’t want it. |
Analysis
My spoiled camera already stop working for a period of time and the most frequent website i view is exabytes.my, now you really make me laugh, i get your joke! LoL
Suspicious 4:
| Therefore, I expect payment from you for my silence. I think $852 is an acceptable price for it! Pay with Bitcoin. My BTC wallet: 1DVU5Q2HQ4srFNSSaWBrVNMtL4pvBkfP5w If you do not know how to do this – enter into Google “how to transfer money to a bitcoin wallet”. It is not difficult. After receiving the specified amount, all your data will be immediately destroyed automatically. My virus will also remove itself from your operating system. |
Analysis
It seems that you care more than me about the data leak and also provide me the steps how to make payment through Bitcoin.
This is also why we call it a “Bitcoin blackmail scam” =)
Suspicious 5:
| My Trojan have auto alert, after this email is read, I will be know it! I give you 2 days (48 hours) to make a payment. If this does not happen – all your contacts will get crazy shots from your dark secret life!And so that you do not obstruct, your device will be blocked (also after 48 hours) |
Analysis
Spammer! I read the similar mail from you last week, you did not keep track on that?
Email actually got a function “Read receipts” and why you need to spend time write a Trojan to track?
Suspicious 6:
| Do not be silly! Police or friends won’t help you for sure … p.s. I can give you advice for the future. Do not enter your passwords on unsafe sites. I hope for your prudence. Farewell. |
Analysis
Finally, I saw a meaningful line in the whole content…Yes, Do not be silly with such scam and I will sure help my friends and clients by spreading out this information ^^
Bye Mr. Spammer and good try.
B) Domain Spoofing
Any domain in this internet can be a victim of domain spoofing.
We deploy SPF record to all shared hosting domains that use our DNS as default to reduce the damage of email spoofing.
The damage only can be reduce through the deploying of SPF, DKIM and DMARC but no technology at the moment that able to prevent domain spoofing.
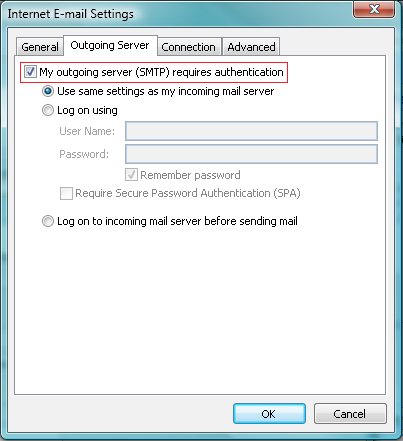
How to enable SMTP authentication for Microsoft Outlook 2010
Below will show you how to enable SMTP authentication for Microsoft Outlook 2010 :
Microsoft Office 2010
1. Launch Microsoft Office 2010
2. Click File > Info > Account Settings

3. Select Email from the list and click “Change” button
4. Click on “More Setting”
5. Select “Outgoing Server” tab
6. Tick ‘My outgoing server (SMTP) requires authentication
7. Click OK after finish configuration.
8.Click “Next” button.
9. In the “Account Settings” window click “Close”
10. Close Outlook and the relaunch it again.
11. Check the network connection ensure you can sent/receive correctly.
12. Done.
List of Email content that trigger SPAM words
Commerce
| As seen on | Buy | Buy direct |
| Buying judgments | Clearance | Order |
| Order status | Orders shipped by | shopper |
Personal
| Dig up dirt on friends | Meet singles | Score with babes |
Employment
| Additional Income | Be your own boss | Compete for your business |
| Double your | Earn $ | Earn extra cash |
| Earn per week | Expect to earn | Extra income |
| Home based | Home employment | Homebased business |
| Income from home | Make $ | Make money |
| Money making | Online biz opportunity | Online degree |
| Opportunity | Potential earnings | University diplomas |
| While you sleep | Work at home | Work from home |
Financial – General
| $$$ | Affordable | Bargain |
| Beneficiary | Best price | Big bucks |
| Cash | Cash bonus | Cashcashcash |
| Cents on the dollar | Cheap | Check |
| Claims | Collect | Compare rates |
| Cost | Credit | Credit bureaus |
| Discount | Earn | Easy terms |
| F r e e | Fast cash | For just $XXX |
| Hidden assets | hidden charges | Income |
| Incredible deal | Insurance | Investment |
| Loans | Lowest price | Million dollars |
| Money | Money back | Mortgage |
| Mortgage rates | No cost | No fees |
| One hundred percent free | Only $ | Pennies a day |
| Price | Profits | Pure profit |
| Quote | Refinance | Save $ |
| Save big money | Save up to | Serious cash |
| Subject to credit | They keep your money — no refund! | Unsecured credit |
| Unsecured debt | US dollars | Why pay more? |
Financial – Business
| Accept Credit Cards | Cards accepted | Check or money order |
| Credit card offers | Explode your business | Full refund |
| Investment decision | No credit check | No hidden Costs |
| No investment | Requires initial investment | Sent in compliance |
| Stock alert | Stock disclaimer statement | Stock pick |
Financial – Personal
| Avoid bankruptcy | Calling creditors | Collect child support |
| Consolidate debt and credit | Consolidate your debt | Eliminate bad credit |
| Eliminate debt | Financially independent | Get out of debt |
| Get paid | Lower interest rate | Lower monthly payment |
| Lower your mortgage rate | Lowest insurance rates | Pre-approved |
| Refinance home | Social security number | Your income |
General
| Acceptance | Accordingly | Avoid |
| Chance | Dormant | Freedom |
| Here | Hidden | Home |
| Leave | Lifetime | Lose |
| Maintained | Medium | Miracle |
| Never | Passwords | Problem |
| Remove | Reverses | Sample |
| Satisfaction | Solution | Stop |
| Success | Teen | Wife |
Greetings
| Dear [email/friend/somebody] | Friend | Hello |
Marketing
| Ad | Auto email removal | Bulk email |
| Click | Click below | Click here |
| Click to remove | Direct email | Direct marketing |
| Email harvest | Email marketing | Form |
| Increase sales | Increase traffic | Increase your sales |
| Internet market | Internet marketing | Marketing |
| Marketing solutions | Mass email | Member |
| Month trial offer | More Internet Traffic | Multi level marketing |
| Notspam | One time mailing | Online marketing |
| Open | Opt in | Performance |
| Removal instructions | Sale | Sales |
| Search engine listings | Search engines | Subscribe |
| The following form | This isn’t junk | This isn’t spam |
| Undisclosed recipient | Unsubscribe | Visit our website |
| We hate spam | Web traffic | Will not believe your eyes |
Medical
| Cures baldness | Diagnostics | Fast Viagra delivery |
| Human growth hormone | Life Insurance | Lose weight |
| Lose weight spam | Medicine | No medical exams |
| Online pharmacy | Removes wrinkles | Reverses aging |
| Stop snoring | Valium | Viagra |
| Vicodin | Weight loss | Xanax |
Numbers
| #1 | 100% free | 100% Satisfied |
| 4U | 50% off | Billion |
| Billion dollars | Join millions | Join millions of Americans |
| Million | One hundred percent guaranteed | Thousands |
Offers
| Being a member | Billing address | Call |
| Cannot be combined with any other offer | Confidentially on all orders | Deal |
| Financial freedom | Gift certificate | Giving away |
| Guarantee | Have you been turned down? | If only it were that easy |
| Important information regarding | In accordance with laws | Long distance phone offer |
| Mail in order form | Message contains | Name brand |
| Nigerian | No age restrictions | No catch |
| No claim forms | No disappointment | No experience |
| No gimmick | No inventory | No middleman |
| No obligation | No purchase necessary | No questions asked |
| No selling | No strings attached | No-obligation |
| Not intended | Obligation | Off shore |
| Offer | Per day | Per week |
| Priority mail | Prize | Prizes |
| Produced and sent out | Reserves the right | Shopping spree |
| Stuff on sale | Terms and conditions | The best rates |
| They’re just giving it away | Trial | unlimited |
| Unsolicited | Vacation | Vacation offers |
| Warranty | We honor all | Weekend getaway |
| What are you waiting for? | Who really wins? | Win |
| Winner | Winning | won |
| You are a winner! | You have been selected | You’re a Winner! |
Calls-to-Action
| Cancel at any time | Compare | Copy accurately |
| Get | Give it away | Print form signature |
| Print out and fax | See for yourself | Sign up free today |
Free
| Free | Free access | Free cell phone |
| Free consultation | Free DVD | Free gift |
| Free grant money | Free hosting | Free installation |
| Free Instant | Free investment | Free leads |
| Free membership | Free money | Free offer |
| Free preview | Free priority mail | Free quote |
| Free sample | Free trial | Free website |
Descriptions/Adjectives
| All natural | All new | Amazing |
| Certified | Congratulations | Drastically reduced |
| Fantastic deal | For free | Guaranteed |
| It’s effective | Outstanding values | Promise you |
| Real thing | Risk free | Satisfaction guaranteed |
Sense of Urgency
| Access | Act Now! | Apply now |
| Apply Online | Call free | Call now |
| Can’t live without | Do it today | Don’t delete |
| Don’t hesitate | For instant access | For Only |
| For you | Get it now | Get started now |
| Great offer | Info you requested | Information you requested |
| Instant | limited time | New customers only |
| Now | Now only | Offer expires |
| Once in lifetime | One time | Only |
| Order now | Order today | Please read |
| Special promotion | Supplies are limited | Take action now |
| Time limited | Urgent | While supplies last |
Nouns
| Addresses on CD | Beverage | Bonus |
| Brand new pager | Cable converter | Casino |
| Celebrity | Copy DVDs | Laser printer |
| Legal | Luxury car | New domain extensions |
| Phone | Rolex | Stainless steel |
To: Sender email address
Could not deliver message to the following recipient(s):
Failed Recipient: Recipient email address
Reason: Remote host said: 550 High probability of spam
Leave e-mail messages on your server (Microsoft Outlook)
When you leave messages on your e-mail server, you can choose from several options to delete your messages. To make your choice, you need to consider several factors about your e-mail usage, such as how long you want the messages to be accessible from multiple computers and the storage limits imposed by your e-mail server administrator. If you exceed your storage limit, you might be unable to receive new messages or might be charged additional fees. Typically, it is best to have one computer set to the default setting that doesn’t leave e-mail messages on the e-mail server. When you use the computer to retrieve your e-mail messages, they are downloaded and deleted from the e-mail server. If you choose not to do this, Outlook allows you to select a time duration for leaving e-mail messages on the server.
- On the Tools menu, click E-mail Accounts.
- Click View or change existing e-mail accounts, and then click Next.
- Select your ISP account, and then click Change.
- Click More Settings.
- Click the Advanced tab, and under Delivery, select the Leave a copy of messages on the server check box.

- Select one of the following options:Click OK, and then click Finish.
- Remove from server after x days E-mail messages are downloaded to your computer but remain on the e-mail server for the number of days that you specify. This is the most common setting for people who want to read their messages at work but also download them for permanent storage on their home computer. We recommend that you choose the smallest number of days that suits your needs. The longer you leave messages on your e-mail server, the greater the risk of exceeding your mailbox size quota.
- Remove from server when deleted from ‘Deleted Items’ E-mail messages are downloaded to your computer but also remain on the e-mail server indefinitely until you delete the e-mail message in Outlook and empty the Deleted Items folder. Just deleting the message doesn’t remove the message from the e-mail server.If you do not select either check box, messages are left on the server indefinitely. You can eventually exceed your mailbox quota, unless you connect to the e-mail server from another computer that has Outlook configured to remove messages from the e-mail server.
How to protect yourself against spam email and phishing
Here are some useful tips – from internet security experts – to help you reduce the amount of spam email you receive:
- Set up multiple email addresses
It’s a good idea to have at least two email addresses:- Private email address
This should only be used for personal correspondence. Because spammers build lists of possible email addresses – by using combinations of obvious names, words and numbers – you should try to make this address difficult for a spammer to guess. Your private address should not simply be your first and last name – and you should protect the address by doing the following:- Never publish your private email address on publicly accessible online resources.
- If you must publish your private address electronically, try to mask it – in order to avoid having the address picked up by spammers. For example, ‘Joe.Smith@yahoo.com’ is an easy address for spammers to find. Try writing it as ‘Joe-dot-Smith-at-yahoo.com’ instead.
- When you need to publish your private address on a website, it’s safer to do this as a graphics file rather than as a link.
- If your private address is discovered by spammers – you should change it. Although this may be inconvenient, changing your email address will help you to avoid spam.
- Public email address
Use this address when you need to register on public forums and in chat rooms, or to subscribe to mailing lists and other Internet services. The following tips will also help you to reduce the volume of spam you receive via your public email address:- Treat your public address as a temporary address. The chances are high that spammers will rapidly get hold of your public address – especially if it is frequently being used on the Internet.
- Don’t be afraid to change your public email address often.
- Consider using a number of public addresses. That way you’ll have a better chance of tracing which services may be selling your address to spammers.
- Private email address
- Never respond to any spam
Most spammers verify receipt and log responses. The more you respond, the more spam you’re likely to receive. - Think before you click ‘unsubscribe’
Spammers send fake unsubscribe letters, in an attempt to collect active email addresses. If you click ‘unsubscribe’ in one of these letters, it may simply increase the amount of spam you receive. Do not click on ‘unsubscribe’ links in emails that come from unknown sources. - Keep your browser updated
Make sure that you use the latest version of your web browser and that all of the latest Internet security patches have been applied. - Use anti-spam filters
Only open email accounts with providers that include spam filtering. Choose an antivirus and Internet security solution that also includes advanced anti-spam features.
Source: Kaspersky
List of wording that trigger as SPAM Emails
At times, you might encounter the situation with the SPAM emails and this article is useful for identifying the potential key words of email that trigger SPAM words:
Commerce
| As seen on | Buy | Buy direct |
| Buying judgments | Clearance | Order |
| Order status | Orders shipped by | shopper |
Personal
| Dig up dirt on friends | Meet singles | Score with babes |
Employment
| Additional Income | Be your own boss | Compete for your business |
| Double your | Earn $ | Earn extra cash |
| Earn per week | Expect to earn | Extra income |
| Home based | Home employment | Homebased business |
| Income from home | Make $ | Make money |
| Money making | Online biz opportunity | Online degree |
| Opportunity | Potential earnings | University diplomas |
| While you sleep | Work at home | Work from home |
Financial – General
| $$$ | Affordable | Bargain |
| Beneficiary | Best price | Big bucks |
| Cash | Cash bonus | Cashcashcash |
| Cents on the dollar | Cheap | Check |
| Claims | Collect | Compare rates |
| Cost | Credit | Credit bureaus |
| Discount | Earn | Easy terms |
| F r e e | Fast cash | For just $XXX |
| Hidden assets | hidden charges | Income |
| Incredible deal | Insurance | Investment |
| Loans | Lowest price | Million dollars |
| Money | Money back | Mortgage |
| Mortgage rates | No cost | No fees |
| One hundred percent free | Only $ | Pennies a day |
| Price | Profits | Pure profit |
| Quote | Refinance | Save $ |
| Save big money | Save up to | Serious cash |
| Subject to credit | They keep your money — no refund! | Unsecured credit |
| Unsecured debt | US dollars | Why pay more? |
Financial – Business
| Accept Credit Cards | Cards accepted | Check or money order |
| Credit card offers | Explode your business | Full refund |
| Investment decision | No credit check | No hidden Costs |
| No investment | Requires initial investment | Sent in compliance |
| Stock alert | Stock disclaimer statement | Stock pick |
Financial – Personal
| Avoid bankruptcy | Calling creditors | Collect child support |
| Consolidate debt and credit | Consolidate your debt | Eliminate bad credit |
| Eliminate debt | Financially independent | Get out of debt |
| Get paid | Lower interest rate | Lower monthly payment |
| Lower your mortgage rate | Lowest insurance rates | Pre-approved |
| Refinance home | Social security number | Your income |
General
| Acceptance | Accordingly | Avoid |
| Chance | Dormant | Freedom |
| Here | Hidden | Home |
| Leave | Lifetime | Lose |
| Maintained | Medium | Miracle |
| Never | Passwords | Problem |
| Remove | Reverses | Sample |
| Satisfaction | Training | Stop |
| Success | Teen | Wife |
Greetings
| Dear [email/friend/somebody] | Friend | Hello |
Marketing
| Ad | Auto email removal | Bulk email |
| Click | Click below | Click here |
| Click to remove | Direct email | Direct marketing |
| Email harvest | Email marketing | Form |
| Increase sales | Increase traffic | Increase your sales |
| Internet market | Internet marketing | Marketing |
| Marketing solutions | Mass email | Member |
| Month trial offer | More Internet Traffic | Multi level marketing |
| Notspam | One time mailing | Online marketing |
| Open | Opt in | Performance |
| Removal instructions | Sale | Sales |
| Search engine listings | Search engines | Subscribe |
| The following form | This isn’t junk | This isn’t spam |
| Undisclosed recipient | Unsubscribe | Visit our website |
| We hate spam | Web traffic | Will not believe your eyes |
Medical
| Cures baldness | Diagnostics | Fast Viagra delivery |
| Human growth hormone | Life Insurance | Lose weight |
| Lose weight spam | Medicine | No medical exams |
| Online pharmacy | Removes wrinkles | Reverses aging |
| Stop snoring | Valium | Viagra |
| Vicodin | Weight loss | Xanax |
Numbers
| #1 | 100% free | 100% Satisfied |
| 4U | 50% off | Billion |
| Billion dollars | Join millions | Join millions of Americans |
| Million | One hundred percent guaranteed | Thousands |
Offers
| Being a member | Billing address | Call |
| Cannot be combined with any other offer | Confidentially on all orders | Deal |
| Financial freedom | Gift certificate | Giving away |
| Guarantee | Have you been turned down? | If only it were that easy |
| Important information regarding | In accordance with laws | Long distance phone offer |
| Mail in order form | Message contains | Name brand |
| Nigerian | No age restrictions | No catch |
| No claim forms | No disappointment | No experience |
| No gimmick | No inventory | No middleman |
| No obligation | No purchase necessary | No questions asked |
| No selling | No strings attached | No-obligation |
| Not intended | Obligation | Off shore |
| Offer | Per day | Per week |
| Priority mail | Prize | Prizes |
| Produced and sent out | Reserves the right | Shopping spree |
| Stuff on sale | Terms and conditions | The best rates |
| They’re just giving it away | Trial | unlimited |
| Unsolicited | Vacation | Vacation offers |
| Warranty | We honor all | Weekend getaway |
| What are you waiting for? | Who really wins? | Win |
| Winner | Winning | won |
| You are a winner! | You have been selected | You’re a Winner! |
Calls-to-Action
| Cancel at any time | Compare | Copy accurately |
| Get | Give it away | Print form signature |
| Print out and fax | See for yourself | Sign up free today |
Free
| Free | Free access | Free cell phone |
| Free consultation | Free DVD | Free gift |
| Free grant money | Free hosting | Free installation |
| Free Instant | Free investment | Free leads |
| Free membership | Free money | Free offer |
| Free preview | Free priority mail | Free quote |
| Free sample | Free trial | Free website |
Descriptions/Adjectives
| All natural | All new | Amazing |
| Certified | Congratulations | Drastically reduced |
| Fantastic deal | For free | Guaranteed |
| It’s effective | Outstanding values | Promise you |
| Real thing | Risk free | Satisfaction guaranteed |
Sense of Urgency
| Access | Act Now! | Apply now |
| Apply Online | Call free | Call now |
| Can’t live without | Do it today | Don’t delete |
| Don’t hesitate | For instant access | For Only |
| For you | Get it now | Get started now |
| Great offer | Info you requested | Information you requested |
| Instant | limited time | New customers only |
| Now | Now only | Offer expires |
| Once in lifetime | One time | Only |
| Order now | Order today | Please read |
| Special promotion | Supplies are limited | Take action now |
| Time limited | Urgent | While supplies last |
Nouns
| Addresses on CD | Beverage | Bonus |
| Brand new pager | Cable converter | Casino |
| Celebrity | Copy DVDs | Laser printer |
| Legal | Luxury car | New domain extensions |
| Phone | Rolex | Stainless steel |
“Unknown error, error number: 0x800c0133” When Sending or Receiving E-mail in Outlook Express
Solution When you try to send or receive messages using Outlook Express, you may receive error message as below.
“An unknown error has occurred. Account: ‘Example’, Server: ‘example.mail.domain.com’, Protocol: POP3, Port: 110, Secure (SSL): No, Error Number: 0x800C0133 “
SYMPTOMS
- All the mail disappear
- Unable to download emails
- E-mail message could not be sent.
CAUSE
This behavior can occur if the Folders.dbx file is missing, damaged, or using the read-only attribute. Usually it will happen at inbox.dbx.
REMEDY
Try to restart the computer, if the problem persists, please follow the following steps.
Rename
the Inbox.dbx file:
- Go to “Tools” > “Options” > “Maintenance” tab > Click “Store Folder”. It will reveal the location of your Outlook Express files.
- Close Outlook Express, goto the location mentioned above. You may copy the location and paste it in the “Start” > “Run” and click “Ok”.
- Rename “inbox.dbx” to “oldinbox.dbx” or name that you prefer.
- Restart the Outlook Express, This creates a new inbox.dbx file automatically.
Recovery old emails
You may recover back the old emails by try the following, if they are not corrupt or damage.
- In Outlook Express, right click on the local folders icon in the folder list.
- Click on New Folder, named it to “Old Inbox”.
- Search for oldinbox.dbx.
- The old emails should be inside the oldinbox.dbx right now.
Changes in Smartermail Password Requirement
Dear Value Clients,
As several cases of our user’s account has been hijacked and being used to send out large volume of unsolicited (SPAM) emails from our mail server which has affected the mail server performance through the past few weeks which we have seen, the following password security policy has been implemented on all global mail server setting, which requires each POP3 account password to have the following requirement :
- The password must have AT LEAST a minimum of 5 characters.
- The password SHOULD NOT be equivalent to the POP3 username.
- The password MUST CONTAIN at least a minimum of 1 symbol. (New policy)
You are advised to update your email account password if your current password does not meet the above requirement. Failure to do so will cause your password to be rejected by the Smartermail mail server and you will be prompted for ‘Password Rejection’ error at the WebMail.
Kindly take note that email users who use mail client (Outlook/Thunderbird/etc…) to retrieve/send emails won’t be affected. However, it is recommended to update the email account password as mentioned above. This is to prevent the email account being compromised for illegal activities such as sending spam or phishing emails.
Please do not hesitate to contact us if you have any enquiries. Thank You!
Best Regards,
JuiceAPac
Creating An E-Mail Account in MS Outlook 2002/03 and Outlook 2007
Microsoft Outlook 2003:
- Open your Microsoft Outlook.
- On the Tools menu, select “E-mail Accounts”.
- Select “Add a new e-mail account”, and click Next.
- Select POP3, and then click Next.
- Your Name: Enter your name as you would like it to appear
- E-mail Address: Enter your E-mail Address
- Incoming Mail Server (POP3): Enter mail.
- Outgoing Mail Server (SMTP): Enter mail.
- User Name: Enter your E-mail Address
- Password: Enter your Password, the password you set when you create this mailbox from your control panel
Notes:
- Replace with your actual domain name.
- Do Not enable “Log on using Secure Password Authentication (SPA).
5. Click on “More Settings” button to continue.
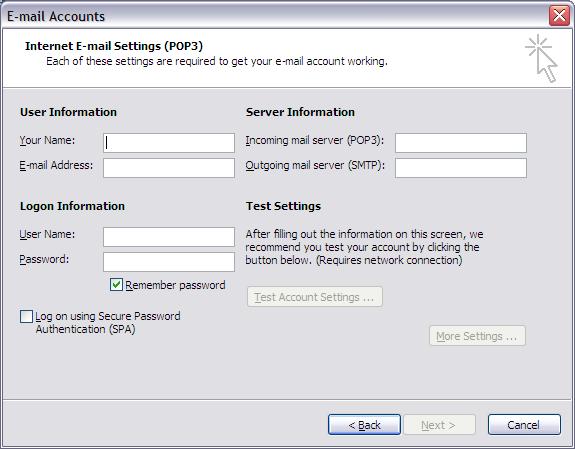
Microsoft Outlook 2007
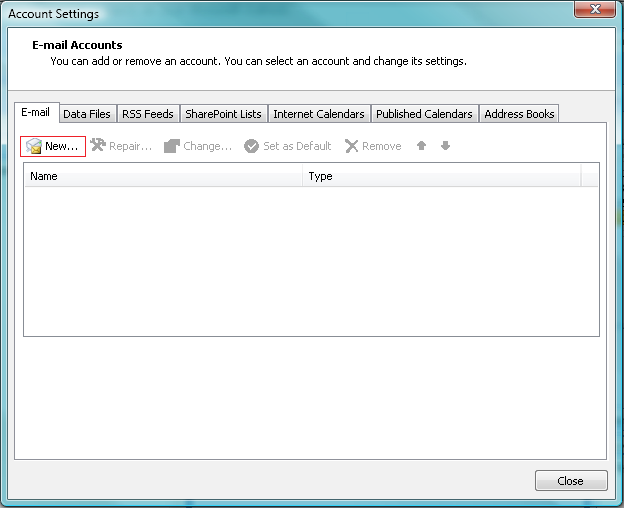
- Launch your Microsoft Outlook 2007
- Go to Tools and select Account Settings.
- Click on the New… to create a new email account as below screen shot.
4. Check on Manually configure server settings or additional server types? as below screen shot
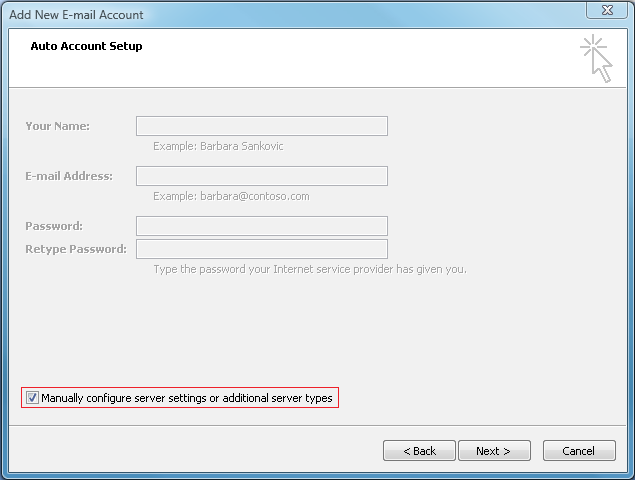
5. Enter your name and full email address on User’s Information section.
6. Select Account Type. You may choose either POP3 or IMAP as we support for both email protocol.
7. Enter mail.domain.com for incoming and Outgoing mail server (SMTP) mail.domain.com
8. Then assign your full email address and password on the Logon information section and check on to remember password
9. Then click on the More settings… as below screenshot.

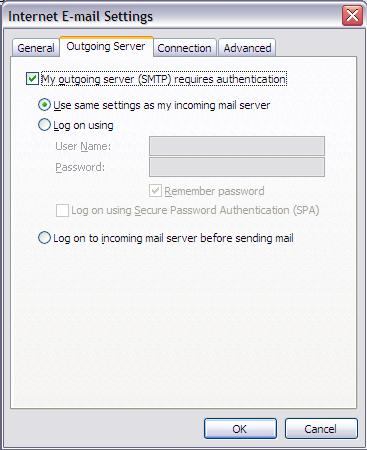
10. Then go to Outgoing server tab to check on My outgoing server (SMTP) requires authentication as it is our currently mail server policyto allow sending from mail client.
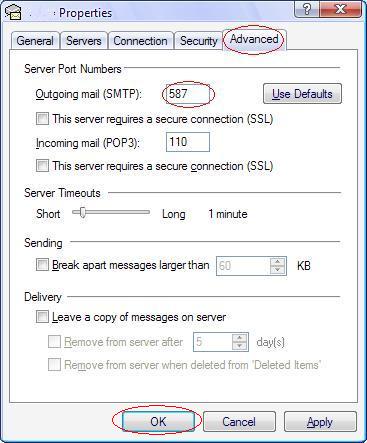
11. Go to Advanced tab and change Outgoing server (SMTP) port from 25 to 587 and click OK.

12. Click Finish and your email account in Microsoft Outlook 2007 is ready to use.

Email Forwarding Policy
Email forwarding to the following service providers will no longer be permitted for domains that reside on both of our Windows and Linux shared/reseller hosting services.
Effective since 1 July 2007:
- aol.com
- comcast.net
- att.net
- msn.com
- hotmail.com
Effective from 1st May 2008:
- yahoo.com
- gmail.com
- tm.net.my
- streamyx.com
- rocketmail.com
Online Group:
- Yahoo! Group(yahoogroups.com)
- Google Group(googlegroups.com)
In order to ensure deliverability of email sent by our customers to accounts at the above noted domains, we are forced to block all email forwarding to these domains. Presently, all of these domains have extremely stringent anti-spam filtering policies in place. If one of our customers configures their email account hosted with us to forward to their personal mailbox with one of the noted service providers and the service provider detects that message as spam, they believe that we are the source of the spam. As a result, our mail server gets blacklisted, even though we are not responsible for this spam.
Unfortunately, even though we are not responsible for this spam, these service providers noted have repeatedly been blacklisting our mail servers, causing legitimate email to be blocked. If you or your customers have forwarders configured to one of the above service providers, please remove the forwarding and convert them to POP3 accounts.
Also, please note that this decision only impacts forwarders. You will still be able to send email to the above noted service providers. In fact, this change will actually make mail delivery to these service providers more reliable, since they will not be repeatedly blacklisting our servers.
Please contact us if you have any problems on this issue.
Greylisting on SmarterMail
Greylisting is a new tool in the fight against spam. What it does is temporarily block incoming mail from a sender. It returns the mail to the sender’s mail server with a message saying try again later. The sending server must then retry sending the mail after the Block Period but before the Pass Period.
Greylisting is effective because spammers will not usually bother to attempt a second delivery, but legitimate e-mail servers will.
Greylisting is a very effective method of spam blocking that comes at a minimal price in terms of performance. Most of the actual processing that needs to be done for Greylisting takes place on the sender’s server. It has been shown to block upwards of 95% of incoming spam simply because so many spammers don’t use a standard mail server which will do automatic retries.
Greylisting Applies to: SmarterMail v4.x and higher
SmarterMail v4.x has introduced its’ new Greylisting feature. This feature essentially bounces all unknown message trying to connect to your server. However, emails from Trusted Senders and White listed IP’s will automatically bypass Greylisting and are delivered directly to the Spool.
The premise is that SPAMMERs create scripts that bombard your server with emails. These messages are then bounced back to their sending email server. Since, most Spammers email is not coming from a valid email server, the messages are not retried and therefore this reduces the amount of SPAM that your customers receive.
For those messages that are returned to valid email servers, the messages will be retried at least four times. If the first retry is beyond the Block period (default 15 minutes) and within the Pass Period (default 6 hours) the message is passed to the Spool and it goes through its normal processing. A record is also created that says this is a valid email address and keeps it for 36 days (default). If another email from the same email address is received within the 36 day, record clock is reset for an additional 36 days and delivered directly to the Spool.
How To Get Full E-mail Header
In order to get Full E-Mail Header from major free email provider and E-Mail Client (Microsoft Outlook & Outlook Express), kindly refer to the step as below.
Outlook Express:
- Open your Outlook Express.
- Right click on the E-Mail whose headers you want to view, a drop down menu will appear.
- From the menu, choose “Properties”.
- Click on the “Detail” tab and you will be able to see the E-Mail header.
Microsoft Outlook 2002/2003:
- Select the email and Right-click the message without opening it, then click “Options” from the drop-down menu.
- A box called “Message Options” pops up.
- Near the bottom of the box you’ll see a text area titled “Internet headers”.
- Highlight the contents, then right-click. You can copy the headers and paste them into an email message or another application.
Mozilla Thunderbird:
- Select the email and Double-click to open the email in a new window.
- Go to View and click Message Source and one more new window will popped out.
- Copy the full email header content and paste it on a email or another application.
Windows Live Hotmail/MSN:
Note: This article is refer to Windows Live Hotmail Full version.
- Right click on the closed E-Mail and a drop down menu will appear.
- Choose View Source on the drop down menu.
- E-Mail header information will show in new Windows.
GMail:
- Log into your GMail Account.
- Open the E-Mail whose headers you want to view.
- You will see “Reply” button on top right of the message pane.
- Click on the little arrow pointing down next to “Reply”.
- Select on “Show original” as images above and the E-Mail header will show in new Windows.
Yahoo! Mail:
- Log into your Yahoo! E-Mail account.
- Open the E-Mail whose headers you want to view.
- Scroll down to the bottom right of the E-Mail, select on “Full Headers”.
- E-Mail header information will show in new Windows.
Apple Mail:
- Click at the selected email.
- Click at View > Message > Long Headers
- Copy the entire information and paste it at notepad for us to analyze.
How to Leave a Backup of Mail at the Server with Outlook Express
If you download your mail from a POP account, Outlook Express will usually delete it immediately after retrieval. This has the advantage that the chance of incoming mail clogging up your account is pretty slim.
But leaving mail at the server (at least for some time) has advantages, too. You can re-retrieve accidentally deleted messages, or download mail to a different email client.
Leave a Backup of Mail at the Server with Outlook Express
To leave a copy of downloaded mail at the server with Outlook Express:
- Select Tools | Accounts… from the menu in Outlook Express.
- Highlight the desired email account.
- Click Properties.
- Go to the Advanced tab.
- Make sure Leave a copy of messages on server is selected.
- Click OK.
- Click the Close button.
How to override default spam filtering rules and Adding Trusted Sender from Smartermail
In Smartermail, you may override the default spam filtering rules according to your own configuration and you may add in the email address of the sender for bypassing the filtering rules and Greylisting.
- Log in to the webmail, http://webmail.domain.com.
- Click at Setting > Filtering > Spam Filtering.
- On the Option tab > select Override spam settings for this account.

4. It will auto load the setting, then click at Actions tab.

5. You could configure your spam setting at this stage.
6. Besides, if you have any trusted Sender account for bypassing the filtering rules and Greylisting, you could click at Trusted Senders tab to add in the trusted sender’s email address.
7. Example as below.

How to redirect page from html file
Place the following HTML redirect code between the <HEAD> and </HEAD> tags of your HTML code.
<meta HTTP-EQUIV=”REFRESH” content=”0; url=http://www.yourdomain.com/index.html”>
The above HTML redirect code will redirect your visitors to another web page instantly. The content=”0; may be changed to the number of seconds you want the browser to wait before redirecting.
How to setup my email client
Windows Mail
- Open Outlook Express, and from the Tools menu select Accounts.
- Click the Add button.
- Select E-mail Account and click Next.
- Type in your Display Name: this is the name that your recipients will see in the “From” field of e-mails that you send. Click Next.
- Enter your complete e-mail address and click Next.
- Select POP3 as Incoming e-mail server type. Enter your incoming and outgoing mail server accordingly. Check the box next to Outgoing server requires authentication. Click Next.
- Enter your complete email address in the E-mail username text field and your email account password in the Password text field.
- Click Next and then – Finish.
Microsoft Outlook 2003/XP Users
- Open Outlook, go to the “Tools” menu, and click on “E-mail Accounts…”
- Click Add, and then click Mail to open the Internet Connection Wizard.
- Click the circle next to “POP3” and then click “Next”
- This screen requires you to enter all your e-mail account information.Your Name: The name you want to appear on all e-mails you send out
E-mail Address: Your Full Email Address
User Name: Your Full Email Address
Password: <your_password>
Incoming Mail server (POP3): mail.your_domain_name.com
Outgoing mail server (SMTP): mail.your_domain_name.com - Once you have filled out the blanks, click on “More Settings…” In this window, click on the “Outgoing Server” tab and ensure that the checkbox “My outgoing server (SMTP) requires authetication” is checked.
- Make sure -Log on using Secure Password Authentication- is UNCHECKED.
- Click -Next-.
- The -Congratulations- window will appear.
- Click -Finish- to complete the account setup.
MS Outlook Express Users
- Start Outlook Express, and on the Tools menu, click “Accounts”
- Click “Add”, and then click Mail to open the Internet Connection Wizard
- On the Your Name page of the wizard, type your name as you want it to appear to everyone who gets e-mail from you, and then click Next.
- On the Internet Explorer Address page, type your e-mail address, and then click “Next”.
- The -Internet E-mail Address- screen will appear, enter your e-mail address, username@your_domain_name.com Click -Next-.
- The -E-Mail Server Names- screen will appear, enter the following information:My incoming mail server is a POP3
Incoming mail (POP3) server: mail.your_domain_name.com
Outgoing mail (SMTP) serve: mail.your_domain_name.com - The -Internet Mail Logon- screen will appear.
- Click the first -log on using- radio button and enter the following information:POP account name:username@your_domain_name.com
Password: userpassword - Click -Next-.
- The -Congratulations- window will appear.
- Click -Finish- to complete the account setup.
- The email account that you have just set up will appear on the original Internet Accounts window. Highlight the account you have just set up by clicking on the account name once. Click on the Properties button to view the account properties
- Click on the Servers tabsheet.
- Click on the My server requires authentication tick box.
- Your email account has now been set up!
Mozilla Thunderbird 1.x Users
- Start Mozilla and click on the -Mail- icon in the lower left corner.
- Once mail is open, click -Edit- then -Mail & Newsgroups Account Settings-.
- Click -Add Account-.
- Select -Email account- then click -Next-.
- Enter -Your Name- and -Email Address- then click -Next-.
- Select -POP- and enter mail.your_domain_name.com as shown then click -Next-.
- Enter your complete e-mail address for -User Name- then click -Next-.
- Enter your complete e-mail address for -Account Name- then click -Next-.
- Click -Finish- to save settings.
- Again, click -Edit- then -Mail & Newsgroups Account Settings-.
- Select -Outgoing Server (SMTP)-.
- Enter mail.your_domain_name.com and your -User Name-. Click -OK- to save.
Eudora 5.x and 6.x Users
- In Eudora, go to the -Tools- menu and select -Options-.
- In the Options window, you will see several icons on the left. Select -Getting Started-.
- In the -Real Name- field, type your name the way you would like people to see it when they get email from you. For example, John Doe.
- In the -Return Address- field, enter your email address. For example: .username@your_domain_name.com
- In the -Mail Server (Incoming)- field, enter the POP mail server as mail.your_domain_name.com
- In the -Login Name- field, enter the login name as username@your_domain_name.com
- In the -SMTP Server (Outgoing)- field, enter the SMTP or Outgoing mail server as mail.your_domain_name.com
- Open Incredimail, and from the Tools menu select Accounts.
- Click the Add button.
- Select “Let me configure settings myself” and click Next.
- Type in your Name: this is the name that your recipients will see in the “From” field of e-mails that you send.
- Enter your complete e-mail address and click Next.
- Select POP3 as Incoming e-mail server type. Enter your incoming and outgoing mail server accordingly. Click Next.
- Enter your complete email address in the Username text field and your email account password in the Password text field.
- Click Finish.
- Now select your e-mail account and click Properties.
- In Servers tab, make sure the Outgoing Mail Server (SMTP) Authentication box is checked.
- If you wish to change your Outgoing Mail Server (SMTP) port number, click Advanced tab.
- To complete the setup, click OK
How to setup POP3 Email Account in Android Phone
- Select the Mail Option.
- The Mail Option will allow you to setup with Exchange ActivSync or Other (POP3/IMAP), Select the option Other (POP3/IMAP).
- Once you entered Other (POP3/IMAP) option, click on manual setup.
- From the incoming settings, fill in all the necessary details as below,
Protocol: POP
Email address: your full email address, such as user@domain.com
Username: your full email address, such as user@domain.com
Password : enter your email password
POP Server: mail.domain.com where domain.com should replace your domain name
Security type : SSL/None, ***if you have SSL for email, choose SSL
Server Port : 110 for normal email account and 995 for SSL email account.
5. From the Outgoing server setting, Enter the following information.
Username: user@domain.com where it should be your email address.
Password : your email password
SMTP server : mail.domian.com where domain.com should replace by your domain name
Security type : SSL/None, ***if you have SSL for email, choose SSL
Server Port : 25 or 587 (if your ISP do not allow port 25, choose port 587) , use port 465 for SSL purpose.
Then click Next.
6. Click on email icon at Android home page.you are now complete setup your Internet email at your Android phone.
How to setup POP3 Email Account in iPad
This article will guide you on how to setup POP email account from iPad.
- If this is the first account you’re setting up on the iPad tap Mail. Otherwise, from the Home screen tap Settings -> Mail -> Accounts -> Add Account.
- Choose your email account type. For setting up email to work with your domain email address tap Other.
- Enter your Name , Address(email address), Email Password ,and description.
- Tap SAVE POP and IMAP will be show on top on bar. You are allow to choose POP3 or IMAP when setup domain email into iPad.
- Tap POP so it will highlighted.
- Fill in all as below POP Info Name : Email name , Address (full email address), and Description.
Incoming Mail server : host name: mail.yourdomain.com, Username: (full email address) Password (email password) > click done/verify. - If system showing message as Cannot verify server identity, tap Details and tap Accept.
- After accept, go back HOME go to -> Settings -> Mail, Contacts, Calendars -> Tap (email account you setup earlier) and check POP and SMTP (outgoing mail server) setting.
- tap SMTP mail.yourdomain.com > tap mail.yourdomain.com On.
- Check your SMTP SSL: off (enable it if your webmail come with SSL) , Authentication: Password, Server Port number : 587 (if you choose SSL you will need to set Server Port as 465 for SMTP) Once confirm tap DONE.
- Go back to email setting page , click advance to check your POP setting, SSL: off, Authentication: Password , Server Port : 110, if you enable SSL you are require set it as : 995.
- Tap Done/Verify, Your iPad is now configure to send and receive your domain email.
How to setup POP3 Email Account in iPhone/iPod Touch
1. Select Settings from the home screen of your iPhone.

2. Choose Mail, Contacts, Calendars
3. Click on Add Account

4. Choose Other from appeared list

5. Select Add Mail Account
In the New Account menu, you will need to specify the following records:
Name: your name, it will appear as a sender name
Address: your full email address
Password: password of this email address
Description: you can specify any description. But we advise you to specify your email address

6. Click on Next.
7. Select protocol type: IMAP or POP3. We may show the sample of using IMAP. The selected one will be highlighted blue.

8. Settings are equal both for IMAP and POP3 on this step:
The fields: Name, Address and Description should have been already filled in due to your previous setting.
Host name: mail.yourdomain.com
User Name: your email address.
Password: password for your email.

9. Click on Next.
10. Click on Save and wait till checking is finished.
When the check is finished you will be redirected to Mail, Contacts, Calendars screen.
Please enter your newly created account and go to Account Info. Scroll down the screen and select Advanced:
You will be able to choose additional settings for IMAP or POP3:
If you set IMAP connection you need to use the 143 (untick SSL.. Please leave IMAP Path Prefix field empty)
If you chose POP3 you need to use the 110 (untick SSL)

11. In order to set up additional settings for Outgoing Server you will need to return in previous menu Account Info and then to enter
Outgoing Mail Server via clicking on Host name of the server. Please select ports and protocols you want to use for Outgoing Server (SMTP): 587 (untick SSL), Authentication: Password

12. Once settings are verified, account is active and ready to use.
How to setup Relay host in mail server
Please refer to the following information to assist in configuring various of the common mail servers:
Microsoft Exchange 2003
Important: If you are using Exchange with smtp-proxy.tm.net.my, you must configure your server to reject invalid recipients during the SMTP session, rather than generating NDRs and sending them out later. In the Message Delivery Properties dialog box in Global Settings, find the Recipient Filtering tab. Make sure that “Filter recipients who are not in the Directory” is checked, and Apply the settings.
- Go to “Start/All Programs/Microsoft Exchange” and click on “System Manager”.
- Expand the “Connectors” item.
- By default, Exchange uses SMTP for outbound connections, so you should find an “Internet Mail SMTP Connector” already there. Right click on it and select “Properties”.
- On the “General” tab, select “Forward all mail through this connector to the following smart hosts” and enter “smtp-proxy.tm.net.my” in the field below.
- On the “Advanced” tab, click on the “Outbound Security” button to get to “Outbound Security” dialog box.
- By default, exchange sets up security to use “Anonymous Access”. Change this to “Basic authentication (password is sent in clear text)” then click the “Modify” button, enter your domain username and password, and click “OK”.
- Back at the “Outbound Security” dialog box, enable “TLS Encryption” and click “OK”.
Microsoft Exchange 2000
Exchange’s SMTP virtual server does not support authentication. In order to use smtp-proxy, you must add an SMTP connector.
Important: If you are using Exchange with smtp-proxy, you must configure your server to reject invalid recipients during the SMTP session, rather than generating NDRs and sending them out later. In the Message Delivery Properties dialog box in Global Settings, find the Recipient Filtering tab. Make sure that “Filter recipients who are not in the Directory” is checked, and Apply the settings.
- Click on Routing Groups -> First routing group -> Connectors.
- Add an SMTP connector by right clicking on Connectors.
- In the properties, select “Forward all mail through this connector to the following smart hosts” and enter smtp-proxy.tm.net.my in the field below.
- Add a local bridgehead. If you have only one server, this is your server.
- Select Properties: Deactivate “Send HELO instead of EHLO”.
- Activate “Do not send ETRN/TURN”.
- On the Delivery Options page, select “Specify when messages are sent through this connector” and specify “Always Run” (or whatever you desire).
- Under the Advanced tab, click “Outbound Security…” then “Basic authentication” then click Modify. Enter your domain username and password here.
- Under Address Space, click Add then SMTP. Domain should be * and cost 1.
- Connector Scope is probably “Entire organization”.
- It is not necessary to click “Allow messages to be relayed through this domain” (and this option probably should not be selected).
Postfix
These instructions is for Mac OS X 10.3 that running postfix 2.0.10. It is expected that other versions of postfix running on various flavors of UNIX/Linux should be similarly configured.
These instructions assume the postfix config files live in /etc/postfix.
In /etc/postfix/main.cf add the lines:
relayhost = smtp-proxy.tm.net.my:25
smtp_sasl_auth_enable=yes
smtp_sasl_password_maps=hash:/etc/postfix/sasl_passwd
smtp_sasl_security_options=
Optionally, also add the lines:
smtp_use_tls = yes
smtp_tls_CAfile = /etc/postfix/cert.pem
smtp_tls_session_cache_database = btree:/var/run/smtp_tls_session_cache
to enable SSL/TLS when sending outgoing mail. Note that the path info in the second command may be different depending on your system and where you have installed your certificates. The last line may be omitted, but should help reduce CPU cycles verifying the certificate chain when sending outgoing E-Mail.
Create a file /etc/postfix/sasl_passwd with the contents:
smtp-proxy.tm.net.my userid:password
where userid and password are your domain username and password.
Next, change the ownership and permissions on the sasl_passwd file to protect it from unauthorized access.
chown root:root /etc/postfix/sasl_passwd
chmod 600 /etc/postfix/sasl_passwd
Finally, create a database file from the contents of the sasl_passwd file:
postmap hash:/etc/postfix/sasl_passwd
OPTIONAL: If you wish to relay only specific domains via smtp-proxy, You will need to do the following:
Remove the relayhost = smtp-proxy.tm.net.my entry in main.cf, if one exists.
Add the following line to your main.cf file: transport_maps = hash:/etc/postfix/transport
Edit /etc/postfix/transport and update it with something similar to the following:
# Syntax: .domain transport:relay_host
# Specifies specific domains for local delivery
my.domain.com :
# Specify all subdomains for local delivery
.my.domain :
# Specify domains that need to be relayed through smtp-proxy.tm.net.my
aol.com relay:smtp-proxy.tm.net.my
hotmail.com relay:smtp-proxy.tm.net.my
Create a database file from the contents of the transport file: postmap hash:/etc/postfix/transport
Lastly, reload postfix: postfix reload
If you want to change the port that Postfix uses to send outgoing mail, we have been told that you may need to change the definition of the SMTP port in /etc/services. We do not have comprehensive instructions for making this change, but some reasonable searching should get you the information you need – when changing /etc/services, though, you should be very careful, as this file controls a large part of the UNIX system’s TCP/IP interactions.
Sendmail
These instructions assume that you already have an appropriate .mc file prepared for your Sendmail configuration, and have the appropriate commands/tools prepared to compile that into a sendmail.cf file and install it in the appropriate location. On some BSD-based systems, this is as simple as typing “make” in /etc/mail and editing $hostname.mc. On other systems, it can be considerably more difficult. Consult the manual for your system or Sendmail for more information.
Add the following lines to your .mc file:
FEATURE(authinfo, `hash -o /etc/mail/authinfo’)
define(`SMART_HOST’, `smtp-proxy.tm.net.my’)
If you need to use an alternate port (other than 25) for smtp-proxy, also add the following line:
define(RELAY_MAILER_ARGS, `TCP $h 2525′)
Create or edit the file /etc/mail/authinfo, and add a line that looks like this:
AuthInfo:smtp-proxy.tm.net.my “U:username” “P:password” “M:LOGIN”
Replacing “username” and “password” with your domain username and password, respectively. Be sure to include the rest of the line exactly as it is shown above, quotes and all. You should make sure that this file is not readable by unpriviledged users, as it contains your login information.
Build the authinfo file into the Sendmail hash database format with the following command:
makemap hash /etc/mail/authinfo < /etc/mail/authinfo
This will create an /etc/mail/authinfo.db file, which Sendmail will use to read the authentication information. You will need to re-run the above command any time you change /etc/mail/authinfo.
Finally, compile your .mc file to a .cf file, install it as sendmail.cf, and re-start Sendmail. Your server should now send all mail via the smtp-proxy.tm.net.my server
Exim
These instructions assume Exim 4.x and have been vetted by our support staff running Exim version 4.20 on FreeBSD 4.8:
In the “MAIN CONFIGURATION SETTINGS” make sure that your primary_hostname and local_domains variables are configured correctly. Otherwise you’ll likely generate nasty loops. Unfortunately we can’t tell you precisely how to configure these as they depend on too many local variables. Consult the Exim documentation for more details on configuring these items.
In the “ROUTERS CONFIGURATION” section, before any other routers, add the following:
send_to_gateway:
driver = manualroute
domains = !+local_domains
transport = remote_smtp
route_list = * smtp-proxy.tm.net.my
In the “TRANSPORTS CONFIGURATION” section, locate the remote_smtp directive and edit it to include:
remote_smtp:
driver = smtp
hosts_require_auth = smtp-proxy.tm.net.my
If you have Exim compiled to use SSL, add the following line as well:
hosts_require_tls = smtp-proxy.tm.net.my
Near the bottom of your configure file, in the “AUTHENTICATION CONFIGURATION”, enter:
login:
driver = plaintext
public_name = LOGIN
client_send = “: username : password”
The username and password should of course be your domain credentials.
Communigate Pro
These instructions is for Communigate Pro version 4.1.7 on Mac OS X 10.3. However, the basic interface for this in Communigate Pro hasn’t changed since 3.0 or earlier. As such, these instructions should work with most versions of Communigate Pro currently in service.
- Using the basic Web interface to administer Communigate Pro, access the SMTP section and select the option “Forward to”.
- Enter smtp-proxy.tm.net.my in the text field to the right of this option.
- In the “Send AUTH” field enter your domain username.
- In the “Password” field enter your domain password.
- Optionally, in the “Send Encrypted (SSL/TLS)” enter smtp-proxy.tm.net.my in the “To Domains” field to engage SSL based encryption for communications between you and our relay server.
qmail
Relaying to a smart host
Setting qmail to route all outgoing SMTP traffic through that server by doing:
echo “:smtp-proxy.tm.net.my” > /var/qmail/control/smtproutes
How to stop receiving duplicate email messages in Microsoft Outlook
Getting duplicate emails via POP3 connection in Microsoft Outlook is quite a common issue. To reduce the possibilities on having duplicates email:
- Make sure that there is no duplicates email account setup on the same MS Outlook.
- Make sure that there is only one MS Outlook is running. Check on the task manager to make sure that there is no duplicate outlook.exe instance running on the same machine. Duplicate instances of outlook.exe running can produce duplicate messages arriving at the same time. You will need to then determine why two instances of Outlook were running in the first place.
- Make sure that you do have Service Pack 2 installed if you are using MS Outlook in Windows XP. You can check on the updates at http://office.microsoft.com/en-us/officeupdate/default.aspx
Between to fix the problem, please try:
- Close the Ms Outlook to disconnect the POP3 access (This is to prevent your email account being locked in the server)
- Login to your webmail account
- Check the inbox and Remove the unwanted emails, spam mails or large size emails
- Login out the webmail
- Reopen the Ms Outlook and try again to receive the emails via POP3 connection
Additional information on the duplicate emails issue can be found at http://support.microsoft.com/?kbid=284404
IMAP vs. POP
What’s the difference?
The main difference, as far as we are concerned here, is the way in which IMAP or POP controls your e-mail inbox.
When you use IMAP you are accessing your inbox on the central mail server. IMAP does not actually move messages onto your computer. You can think of an e-mail program using IMAP as a window to your messages on the server. Although the messages appear on your computer while you work with them, they remain on the central mail server.
POP does the opposite. Instead of just showing you what is in your inbox on the mail server, it checks the server for new messages, downloads all the new messages in your inbox onto your computer, and then deletes them from the server. This means that every time you use POP to view your new messages, they are no longer on the central mail server.
IMAP makes it easier to view mail from home, work, and other locations
Because IMAP leaves all of your messages on the central mail server, you can view these messages from any location with Internet access. This means the e-mail inbox you view from home will be the same one you see at work.
Since POP downloads new messages to your computer and removes them from the server, you will not be able to see those new messages on another computer when you check your inbox. Those messages exist only on the computer that downloaded them using POP.
However, if you use IMAP and create e-mail folders on the server, these folders are accessible from anywhere you read your e-mail using IMAP. If you use POP and create e-mail folders, they are stored locally, and you cannot access these folders from anywhere except the computer on which you created them.
POP can create problems if you alternate between it and IMAP. There is an option in many POP e-mail programs to leave copies of the messages on the server, but this option has complications. When you leave copies of the messages on the server, then access your e-mail using WebMail or another IMAP e-mail client, the POP client may create duplicate messages next time it accesses the inbox; you will see each of the messages more than once, and you will have to clean out (delete) the unwanted ones.
You may want to keep local copies
While using IMAP to save e-mail on the central mail server is recommended, there are reasons to have local copies of messages (messages downloaded to the computer, as with POP). Fortunately, IMAP allows you to keep local copies of all your messages. The option of local copies is useful when you are connecting from a dial-up connection. You may want to download your messages, then disconnect from the Internet and work with your mail offline. Please note that while you are working offline, you cannot send or receive mail. You need to be connected to the Internet to do those tasks.
Leave a Copy of Email on Mail Server
When you retrieve emails from a POP3 email account, the emails are deleted from the Mail Server by default after they are downloaded to your computer. However, if you want to check your emails from multiple computers, you must configure Mail Client to not delete the emails on your Mail Server. This scenario is most common for people who want to check their home Internet service provider (ISP) email account from work and download the emails for permanent storage on their home computer.
When you leave emails on your Mail Server, you can choose from several options to delete your emails. To make your choice, you need to consider several factors about your email usage, such as how long you want the emails to be accessible from multiple computers and the storage limits imposed by your email server administrator. If you exceed your storage limit, you might be unable to receive new emails or might be charged additional fees.
In Outlook, it allows you to select a time duration for leaving email on the Mail Server.
- On the ‘Tools’ menu, click ‘E-mail Accounts’.
- Click ‘View or change existing e-mail accounts’, and then click ‘Next’.
- Select your email account, and then click ‘Change’.
- Click ‘More Settings’.
- Click the ‘Advanced’ tab, and under ‘Delivery’, select the ‘Leave a copy of messages on the server’ check box.
- Under ‘Internet E-mail Settings’ dialog box, select one of the following options:
a) Remove from server after x days
Emails are downloaded to your computer but remain on the Mail Server for the number of days that you specify. This is the most common setting for people who want to read their emails at work but also download them for permanent storage on their home computer. We recommend that you choose the smallest number of days that suits your needs. The longer you leave emails on your Mail Server, the greater the risk of exceeding your mailbox size quota.
b) Remove from server when deleted from ‘Deleted Items’
Emails are downloaded to your computer but also remain on the Mail Server indefinitely until you delete the emails in Outlook and empty the ‘Deleted Items’ folder. Just deleting the email doesn’t remove the email from the Mail Server.
*** If you do not select either check box, emails are left on the server indefinitely. You can eventually exceed your mailbox quota, unless you connect to the Mail Server from another computer that has Outlook configured to remove emails from the Mail Server.
7. Click OK, and then click Finish.
Print an Email Including Background Images in Outlook Express
To print a message with its background images in Outlook Express:
- Open an Internet Explorer window.
- Select Tools | Options… from the menu.
- Go to the Advanced tab.
Make sure Print background images and colors is checked under Printing.
- Click Apply.
- Open the message you want to print in Outlook Express.
- Select File | Print… from the menu.
- Choose your options and click Print.
- Optionally, change the Print background images and colors back to the off default in Internet Explorer.
Setting up email client using port 587
For those who wish to maintain using their own mail server, another alternative is to use port 587 It may or may not be turned on. You’ll need to check with the administrator or hosting service whether they has turned on and support port 587.
Outlook express
- To configure port 587 at outlook express, click on the Advance tab as below and put port 587 for Outgoing mail (SMTP). Click Apply, then click OK.
Microsoft outlook 2003
- To configure port 587 at Microsoft outlook 2003, click More Settings (refer above). Click on the Advance tab as below and put port 587 for Outgoing mail (SMTP). Click Apply, then click OK.

Microsoft outlook 2000
- To configure port 587 at Microsoft outlook 2000, click on the Advance tab as below and put port 587 for Outgoing mail (SMTP). Click Apply, then click OK.

Mozilla Thunderbird
- To configure port 587 at Mozilla Thunderbird, change the Port: (refer below) from port 25 to port 587. Click OK.

Eudora
- To configure port 587 at Eudora, Open Eudora and create a new message.
- Paste the following string into the message: x-eudora-option:SMTPPort=587
- Hit enter and the string should turn into a link then hold the “Alt” key and click the link and click “OK” in the pop-up window.

MAC OS X Mail
- To configure port 587 at MAC OS X Mail, put port 587 at theServer Port: as below. Click OK.

Setting up SMTP proxy for email client
Outlook express
- Start Outlook Express, click the Tools menu at the top of the window and then click Accounts.
- When the Internet Accounts window opens click on the Mail tab .Click on mail properties
- Click on the servers tab as below. Type smtp-proxy.tm.net.my as outgoing mail.
- In the Outgoing Mail Server window unchecked My server requires authentication.
- Click Apply, then click OK. Close the Internet Accounts window.

Microsoft outlook 2003
- Open Microsoft Outlook and and go to Tools – Email Accounts…
- Click the View or Change existing email accounts option, and click Next.
- Highlight the type of email accounts you already have configured for Microsoft Outlook
- Click the Change button. The Internet Email Settings dialog box appears, showing the settings for your existing account. Click the More Settings button.
- The next Internet Email Settings dialog box appears containing four tabs. Click the Outgoing Server tab. Set outgoing server as smtp-proxy.tm.net.my
- Unchecked the checkbox for My outgoing server (SMTP) requires authentication.
- Click OK, then Next, then Finish.

Microsoft outlook 2000
- Start Outlook 2000 then proceed to Tools > Internet Accounts. In the Internet Accounts window, click on your streamyx/ tm.net.my’ account under the Mail tab then select Properties.
- Select the Servers tab. On this tab make sure the entry for the Outgoing Mail Server is set to smtp-proxy.tm.net.my and that the My server requires authentication box is unchecked
- Click Apply, then click OK. Close the Internet Accounts window
Mozilla Thunderbird
- Open Thunderbird Mail. From the Tools menu select Account Settings.
- At the left pane, select the entry Outgoing Server (SMTP). The Outgoing Server (SMTP) Settings appear on the right.
- Edit to modify the entry of SMTP server as smtp-proxy.tm.net.my
- In the User Name box enter your email address.
- Click the OK button.

Eudora
- Open Eudora. From the Tools menu, choose Options.
- Choose Getting Started from the Category list.
- In the SMTP Server (Outgoing) field, type smtp-proxy.tm.net.my
- Uncheck the box next to Allow authentication.
Click the OK button. - Upon sending an email message, a box will appear prompting for the password to send email.

MAC OS X Mail
- With Mac OS X Mail Client open, from the Mail menu, select Preferences
- Select the Accounts option at the top of Preferences
- Click the Plus (+) sign at the bottom of the screen
- Click on the Account Information tab at the top and enter the following information:
- Account Type: POP
- Description: Email
- E-Mail Address: Your preferred domain email
- Full Name: Your full name
- Incoming Mail Server: Your domain pop server
- User Name: Your Emailadd
- Password: Your password
- SMTP Server: smtp-proxy.tm.net.my


Setup email in Apple Mail 1.2.5 for Mac OS X
Type of email account you have: POP, IMAP
Outgoing Mail (SMTP) Server: mail.yourdomain
Incoming Mail (POP3) Server: mail.yourdomain
E-mail Account Username : Your Full E-mail Address
E-mail Account Password : Your E-mail Password
- Open Mail.
- Choose Preferences from the Mail menu. If you have not yet set up any accounts, the Mail Setup window appears, and you can skip to Step 7.
- Click the Accounts icon in the Mail Preferences window.
- Click Create Account.
- Choose the correct account type from the pop-up menu.
- In the Description field, type any name you would like to use to identify the account. This is the name that will appear in your list of accounts.
- Using the rest of the information you gathered, complete the rest of the fields. Be sure to click the checkbox to enable the “Use authentication when sending mail” option.
- If desired, click the Account Options tabs to change the default account behavior.
- Click OK when you are finished.
Setup email in Apple Mail 2.x for Mac OS X
Type of email account you have: POP, IMAP
Outgoing Mail (SMTP) Server: mail.yourdomain
Incoming Mail (POP3) Server: mail.yourdomain
E-mail Account Username : Your Full E-mail Address
E-mail Account Password : Your E-mail Password
- Open Mail using either the shortcut in your dock, or in “Applications” folder.
- From the File menu, select Add Account.
- In the pull-down menu labeled “Account Type” choose your e-mail account type. Generally speaking, most email accounts are POP accounts. Enter your full name and email address.
- Click Continue.
- Enter your incoming mail server (also known as the POP3 server), user name, and password.
- Click Continue, mail will attempt to verify the data you entered.
- Make sure Use Secure Sockets Layer (SSL) checkbox is empty.
- Click Continue.
- Type in your Outgoing Mail Server (also known as a SMTP server).
- Check the User Authentication checkbox and enter your user name and password.
- Click Continue, mail will attempt to verify the data you entered.
- Make sure Use Secure Sockets Layer (SSL) checkbox is empty.
- Click Continue.
- Make sure the information you have entered is correct. Click Continue.
- Click Continue and your account will be setup in Apple Mail. To add another email account, click Create Another Account. To finish the process, click Done.
SPF (Sender Policy Framework)
An extension of SMTP which stops email spammers from forging the “From” fields in an e-mail. Due to SMTP itself does not have the mechanism to authenticate, SPF provides the authentication scheme by specifying which computers are authorized to send email from a specific domain.
To use SPF, the domain sending e-mails must establish an SPF record that is published in DNS records. When e-mail passes through the DNS server, it is compared to the SPF record for that domain to determine if the sender is authorized to send e-mails from that sender’s address. If the e-mail comes from a domain that is not authorized, the DNS server will not forward the e-mail to the expected destination.
SPF only stops the spammer from forging the “From” field in the e-mail and does not stop the spammer from sending e-mails from a domain in which it is a member.
Switching from SMTP port 25 to other port
Kindly refer to the below steps on switching from SMTP port 25 to other port in your email client settings.
Microsoft Outlook 2007
- Open Microsoft Outlook 2007. From the Tools menu select Account Settings.
- Select your account under the E-mail tab, then click Change button.
- The Internet E-mail Settings dialog box appears, showing the settings for your existing account. Click the More Settings button.
- Go to Advanced tab, under Outgoing server (SMTP), change port 25 to your new assigned port.
- Click the OK button.
Windows Mail
- Start Windows Mail, click the Tools menu at the top of the window and then click Accounts.
- Select your account under Mail, then click Properties button.
- Go to Advanced tab, under Outgoing server (SMTP), change port 25 to your new assigned port.
- Click the OK button.
Mozilla Thunderbird
- Open Thunderbird Mail. From the Tools menu select Account Settings.
- At the left pane, select the entry Outgoing Server (SMTP) and the settings will appear on the right.
- Select your account, then click Edit.
- Change port 25 to your new assigned port.
- Click the OK button.
Other versions of Microsoft Outlook
- Tools > Account Settings
- Double click on your email account > More Settings
- Goto Advanced tab, under Outgoing server (SMTP), change the port 25 to your new assigned port.
Outlook Express
- Start Outlook Express, click the Tools menu at the top of the window and then click Accounts.
- Double click on your email account
- Goto Advanced tab, under Outgoing server (SMTP), change the port 25 to your new assigned port.
Mozilla 1.x
- Launch the Mozilla mail client.
- Drop down the Edit menu, and choose Mail and Newsgroup Account Settings.
- Click Outgoing Server (SMTP).
- On the right hand side next to the server name change the port 25 to your new assigned port.
Netscape 7.x
- Launch the Netscape mail client.
- Drop down the Edit menu, and choose Mail and Newsgroup Account Settings.
- Click Outgoing Server(SMTP).
- On the right hand side next to server name change the port 25 to your new assigned port.
Netscape 4.x
- Launch Netscape.
- Drop down the Edit menu, and choose Preferences.
- Expand Mail and Newsgroups by click the + sign.
- Click Mail Servers.
- On the right side change the Outgoing Mail Server: from mail.domain.com to mail.domain.com:xx (xx is your new assigned port).
Eudora for Windows
Eudora has chosen to hide the Port change option in version 6.0 and above, to enable changing ports:
- Navigate to your Eudora install directory.
- Look in the Eudora directory for the directory “extrastuff”.
- In this directory is a file named “esteric.epi”. Drag (copy or move) this file into the main Eudora directory. There will now be options extra listed, including a Ports Page.
To change the outgoing mail port from 25 to your new assigned port.
- Launch Eudora.
- Drop don the Tools menu, and choose Options.
- Click on Ports, change from 25 to your new assigned port.
Eudora for Mac
- For version 6.0 and above, quit Eudora and look in the Eudora Application Folder for the folder “Extras”. In this folder is a file “Esoteric Setting”. Drag this file into the “Eudora Stuff” folder.
- Launch Eudora.
- Drop down the Special menu, and choose Settings.
- Click on Ports and Protocols.
- Change the port from 25 to your new assigned port.
Entourage
- Launch Entourage.
- Drop down the Tools menu, and choose Accounts.
- Click on Mail, and go to Properties.
- Click Advanced Sending Options.
- Make sure the box of “This POP service requires a secure connections” is unchecked.
- Check the box of “Override default SMTP port:” and enter in your new assigned port.
Understanding Email Spoofing
Email spoofing refers to email that appears to have been originated from one source when it was actually sent from another source. Individuals, who are sending “junk” email or “SPAM”, typically want the email to appear to be from an email address that may not exist. This way the email cannot be traced back to the originator.
Malicious Spoofing
There are many possible reasons why people send out emails spoofing the return address: sometimes it is simply to cause confusion, but more often it is to discredit the person whose email address has been spoofed: using their name to send a vile or insulting message.
Sometimes email spoofing is used for what is known as “social engineering”, which aims to trick the recipient into revealing passwords or other information. For example, you get an email from what appears to be the LSE’s email administrator, or from your ISP, asking you to go to a Web page and enter your password, or change it to one of their choosing. Alternatively, you might receive an email asking for detailed information about a project. The From field suggests that the message comes from the LSE, but instead it is from a competitor.
Dealing with a Spoofed Email
There is really no way to prevent receiving a spoofed email. If you get a message that is outrageously insulting, asks for something highly confidential, or just plain doesn’t make any sense, then you may want to find out if it is really from the person it says it’s from. You can look at the Internet Headers information to see where the email actually originated.
Remember that although your email address may have been spoofed this does not mean that the spoofer has gained access to your mailbox.
Displaying Internet Headers Information
An email collects information from each of the computers it passes through on the way to the recipient, and this is stored in the email’s Internet Headers.
1. With the Outlook Inbox displayed, right-click on the message and click on the Options command to display the Message Options dialog box.
Internet Headers are best read from the bottom up, as they are added to as the email passes through the system.
2. Scroll to the bottom of the information in the Internet Headers box, then scroll slowly upwards to read the information about the email’s origin. The most important information follows the “Return-path:” and the “Reply-to:” fields. If these are different, the email is not who it says it’s from.
Updates on Outbound SMTP Server (MY Server)
Dear Valued Client & Business Partners,
Please be informed that affective 3rd Dec 2007, TMNET that they have block all the outgoing mail server port 25. Only Outbound SMTP traffic from smtp.streamyx.com and smtp.tm.net.my will be allowed. With this implementation, Streamyx customers who have their own mail server (Example: mail.yourdomain.com) will not be able to send out e-mails using email program.
Note: Clients who are using JuiceAPac Webmail or using other Internet Service Provider that allows custom SMTP server will not be affected.
===========================
How to overcome this problem?
===========================
Solution #1 (Recommended)
===========================
To overcome this problem, JuiceAPac had created a new port for SMTP server, JuiceAPac clients who were affected, may change the SMTP Server from Port 25 to Port 366.
To change the SMTP Port, kindly refer to our knowledge base article as below:
For Microsoft Outlook, Outlook Express, Thunderbird:
https://www.juiceapac.com/knowledgebase/switching-from-smtp-port-25-to-other-port/
Solution #2 (Provided by TM)
===========================
You may change your SMTP server to the open-relay server provided by TM. Please be assured that by using this option, your email address is still remaining as user@yourdomain.com.
Kindly refer to http://webmail.tm.net.my/info/proxy.html on how to configure your email client in order to utilize this relay server. Alternatively, your e-mail administrators can refer to http://webmail.tm.net.my/info/smtp-proxy.html as a guide to configure your company’s email servers.
===========================
References:
===========================
Official Announcement by TM:
http://www.tm.net.my/tmnet2006/contents/corporate/news_details.cfm?id=1411&type=News&pg=1
Feel free to contact us if you have further enquiries. Thanks.
Updates on Outbound SMTP Server (US Server)
Dear Valued Customers,
Please be informed that affective 3rd Dec 2007, Telekom Malaysia Berhad had blocked OUTBOUND Simple Mail Transfer Protocol (SMTP) traffic or port 25 for all out going e-mails from dynamic IP addresses. Only Outbound SMTP traffic from smtp.streamyx.com and smtp.tm.net.my will be allowed. With this implementation, Streamyx customers who have their own mail server (Example: mail.YourDomain.com) will not be able to send out e-mails using email program.
Note: Clients who are using JuiceAPac Webmail or using other Internet Service Provider that allows custom SMTP server will not be affected.
===========================
How to overcome this problem?
===========================
Solution #1 (Recommended)
===========================
To overcome this problem, JuiceAPac had created a new port for SMTP server, JuiceAPac clients who were affected, may change the SMTP Server from Port 25 to Port 26.
To change the SMTP Port, kindly refer to our knowledge base article as below:
For Microsoft Outlook, Outlook Express, Thunderbird:
https://www.juiceapac.com/knowledgebase/switching-from-smtp-port-25-to-other-port/
Solution #2 (Provided by TM)
===========================
You may change your SMTP server to the open-relay server provided by TM. Please be assured that by using this option, your email address is still remaining as YOU@YourDomain.com.
Kindly refer to http://webmail.tm.net.my/info/proxy.html on how to configure your email client in order to utilize this relay server. Alternatively, your e-mail administrators can refer to http://webmail.tm.net.my/info/smtp-proxy.html as a guide to configure your company’s email servers.
===========================
References:
===========================
Official Announcement by TM:
http://www.tm.net.my/tmnet2006/contents/corporate/news_details.cfm?id=1411&type=News&pg=1
If you have any enquiries, please do not hesitate to contact us. Thank You!
Why am I receiving duplicate copies of email messages, and how do I stop it?
Symptoms
If you are receiving duplicates of only some of your mail, the cause may be technical difficulty along the delivery path. Either a network connection is having problems, or one of the computers along the route is very slow or having other system problems.
Explanation
Most mail delivery protocols and programs are conservative. If they are unsure whether a mail message was successfully passed along to the next computer on the network, the sender will try to send it again. If the message was passed along successfully the first time, the second attempt will produce a second copy of the same message, and you will likely receive both copies.
On large networks such as the Internet, a mail message must usually pass through several different computers before it reaches its final destination. This problem can potentially occur at any computer along the way.
A synchronization problem in the SMTP mail delivery protocol, which is used by most mail programs on the Internet, can make this error more likely.
No solution
Unfortunately, there is no real solution to this, except to wait until the problem on the network is resolved.